AWS Amplify provides a suite of libraries and UI components that make it easy to integrate common features into your applications, such as authentication, storage, and analytics. These components are pre-built and can be easily integrated into your application with just a few lines of code.

For example, let’s say you are building a social networking application and you want to add authentication to allow users to sign up and log in. With AWS Amplify, you can use the built-in authentication components to add this functionality to your application with just a few lines of code.
First, you would need to configure the authentication components in your AWS Amplify project. This involves setting up the authentication provider (e.g. Facebook, Google, or Amazon Cognito) and defining the authentication rules (e.g. minimum password length, password strength, etc.).
Once the authentication components are configured, you can integrate them into your application. This involves importing the authentication components into your application and calling the appropriate methods to sign up, log in, and log out users.
The authentication components handle all of the heavy lifting, such as validating user credentials, generating and storing access tokens, and handling errors. This means that you can focus on building the core functionality of your application, rather than worrying about implementing authentication from scratch.
In addition to the authentication components, AWS Amplify also provides other libraries and services for building scalable, secure applications. For example, you can use the Amplify Storage library to easily add cloud storage to your application, allowing users to upload and download files.
You can also use the Amplify Analytics service to track user behavior and usage patterns in your application. This can be useful for identifying trends, analyzing user engagement, and improving the user experience.
Overall, AWS Amplify is a powerful development platform that makes it easy to build secure, scalable applications. By providing a suite of libraries and services for front-end and back-end development, AWS Amplify allows developers to focus on building their applications, rather than worrying about managing infrastructure. So, it makes the app development process faster and easier.
]]>
In today’s blog post, we’ll explore how to create a React Native TV application using the react-native-tvos library. React Native is a popular framework that allows developers to build cross-platform mobile applications using JavaScript and React. With the react-native-tvos package, you can leverage the same React Native codebase to build apps specifically tailored for tvOS, the operating system that powers Apple TV devices.
This tutorial assumes you have a basic understanding of React Native and its concepts. If you are new to React Native, consider reading through the official documentation before diving into this tutorial.
- Setting up the project
First, make sure you have the following tools installed on your machine:
- Node.js
- Watchman
- Xcode (for macOS users)
- React Native CLI
Next, we will create our React Native TV app using the react-native-tvos CLI:
npx react-native init MyApp --template=react-native-tvosThis command creates a new React Native project named “MyApp” and sets up the react-native-tvos template for tvOS development.
- Running the tvOS application
To run the tvOS application on a simulator, navigate to the project folder and execute the following command:
cd MyApp
npx react-native run-ios --simulator="Apple TV"- Building a simple tvOS application
In this example, we will create a simple tvOS app that displays a list of TV shows. First, replace the contents of App.js with the following code:
import React, {useState} from 'react';
import {SafeAreaView, StyleSheet, Text, View, FlatList, TouchableOpacity} from 'react-native';

const TVShows = [
  {id: '1', title: 'Breaking Bad'},
  {id: '2', title: 'Game of Thrones'},
  {id: '3', title: 'Stranger Things'},
  // ...add more shows as desired
];

const App = () => {
  const [selectedShow, setSelectedShow] = useState(null);

  const renderItem = ({item}) => (
    <TouchableOpacity
      style={styles.listItem}
      onPress={() => setSelectedShow(item.title)}>
      <Text style={styles.title}>{item.title}</Text>
    </TouchableOpacity>
  );

  return (
    <SafeAreaView style={styles.container}>
      <Text style={styles.header}>React Native TV App with React-Native-Tvos</Text>
      <FlatList
        data={TVShows}
        renderItem={renderItem}
        keyExtractor={item => item.id}
      />
      {selectedShow && (
        <View style={styles.selectedShow}>
          <Text style={styles.selectedShowText}>You selected: {selectedShow}</Text>
        </View>
      )}
    </SafeAreaView>
  );
};

const styles = StyleSheet.create({
  container: {
    flex: 1,
    backgroundColor: '#222',
  },
  header: {
    fontSize: 24,
    fontWeight: 'bold',
    color: '#FFF',
    textAlign: 'center',
    marginVertical: 20,
  },
  listItem: {
    padding: 20,
  },
  title: {
    fontSize: 18,
    color: '#FFF',
  },
  selectedShow: {
    padding: 20,
    borderTopColor: '#444',
    borderTopWidth: 1,
  },
  selectedShowText: {
    fontSize: 18,
    color: '#FFF',
  },
});

export default App;
In the code above, we created a functional component that uses a FlatList to display TV show titles from the TVShows array. Each title is wrapped in a TouchableOpacity component, which allows users to select the show by clicking on it. Once a show is selected, its title is displayed below the FlatList.
- Styling the tvOS application
You can customize the appearance of your tvOS app using React Native’s StyleSheet, which is similar to CSS but with a few differences tailored to the platform. In the provided code, we’ve created a simple dark theme using the styles object.
- Running the application
Now that we’ve built our simple tvOS app, run the application in the simulator using the following command:
npx react-native run-ios --simulator="Apple TV"In this tutorial, we’ve learned how to create a React Native TV application using the react-native-tvos library. By following these steps, you can build cross-platform apps that work seamlessly on Apple TV devices, all while leveraging your existing React Native knowledge.
As you explore more about tvOS development with React Native, you may want to look into more advanced features like integrating with TV services, handling remote control events, and optimizing the user experience for larger screens. The React Native documentation and the react-native-tvos GitHub repository are excellent resources for diving deeper into these topics.
]]>MAP (to transform collection)
Map enumerator returns a new array by iterating a block of code on every element. In the end we will get the new array having all the transformed values. To understand this better first lets pick some piece of code we will run our enumerable on. For this example I will be using a csv having thousands of rows of data of classic rock songs, you can find it here along with final source code for all the examples in this post https://github.com/akshatpaul/articles
Lets first read this csv file, following code will do the same and print first record from it, also show the count for number of records in this csv:
require 'csv'
songs = CSV.read('classic-rock-song-list.csv', :headers => true, :header_converters => :symbol)


p songs.first
p songs.count
Output
$ ruby songs.rb


#<CSV::Row name:"Caught Up in You" artist:".38 Special" year:"1982" combined:"Caught Up in You by .38 Special" first:"1" year:"1" playcount:"82" fg:"82">
2229
2229 wow that’s a hige collection of records and quite a lot of information there, what if we only need artist from this plethora of data. This is one of the most common pattern of transformation of data where we convert data from collection 1 into collection 2.
Lets first write a block of code for this :
require 'csv'
songs = CSV.read('classic-rock-song-list.csv', :headers => true, :header_converters => :symbol)


artists = []
songs.each do |song|
    artists << song[:artist]
end


p artists.first
Output
$ ruby songs.rb
".38 Special"
What we have done here is a implemented simple block of code where we are iterating over each element from songs collection and then saving only artist information in artists array. Intear of printing first artist with artists. First you can actually check the count or print the whole array to see complete result.
This pattern is so common in Ruby that we have a name for it Map. With map method same code can be reduced to following :
artists = songs.map do |song|
    song[:artist]
end
This is a very simple example and keeping it separate line is not paying proper respect to beauty of Ruby programming language. We can actually make our code snippet inline:
require 'csv'
songs = CSV.read('classic-rock-song-list.csv', :headers => true, :header_converters => :symbol)
artists = songs.map { |song| song[:artist] }
p artists.first
Output:
ruby songs.rb
".38 Special"
The output remain the same whether you write full definition or replace it with a Map.

This was a very simple example but look at the ease with which we are able to remove definition with a simple and elegant inline code with Map enumerable.
Select (to filer a collection)
As the name suggest with Select enumerable we can iterate over a collection and filter out data based on certain condition. In continuation from our above example lets only pickup song records out of 2229 whose playcount is over 50. If we write a Ruby code for to get the result it will be something like this:
require 'csv'
require 'pry'
songs = CSV.read('classic-rock-song-list.csv',
                  :headers => true,
                  :header_converters => :symbol)
result = []
songs.each do |song|
    result << song if song[:playcount].to_i >=50
end
p result.count
Output:
$ ruby songs.rb
250
Our result is now reduced to 250 from 2229 if you try to print result array you will find complete records for songs whose playcount is 50. Lets transform this code using select :
require 'csv'
songs = CSV.read('classic-rock-song-list.csv',
                  :headers => true,
                  :header_converters => :symbol)
result = songs.select do |song|
    song[:playcount].to_i >=50
end
p result.count
Output:
$ ruby songs.rb
250
Here we have used select enumerator to get only records based on playcount condition. However this do and end are just a drag since we are working with Ruby we can definetly make it a bit clean.
require 'csv'
songs = CSV.read('classic-rock-song-list.csv',
                  :headers => true,
                  :header_converters => :symbol)
result = songs.select { |song| song[:playcount].to_i >=50 }
p result.count
Output:
$ ruby songs.rb
250

As you see the output remains same in both the cases when you write complete defiation or simply replace it with a inline Select.
Reduce (to Aggregate values)
Reduce aggregates all the elements of the collection based on a binary operation applied to it. Let’s take an example in our csv we have playcount against every song in order calculate average playcount for our list of classic rock songs we would need to sum up the playcount columns and divide by total number of records. The block of code for such an operation would be something like this:
require 'csv'
songs = CSV.read('classic-rock-song-list.csv',
                  :headers => true,
                  :header_converters => :symbol)
total_playcount = 0
songs.each do |song|
    total_playtime += song[:playcount].to_i
end
p total_playcount/songs.count
Output
Perfect, but of course we do have an enumerable for this called reduce. With reduce you get an accumulator value and an element. Based on the operation application the new values will be in accumulator. Let’s revisit above code with reduce enum :
require 'csv'
songs = CSV.read('classic-rock-song-list.csv',
                  :headers => true,
                  :header_converters => :symbol)
total_playcount = songs.reduce(0) do |sum, song|
    sum + song[:playcount].to_i
end
p total_playcount/songs.count
Output <div style=”background: #ffffff; overflow:auto;width:auto;border:solid gray;border-width:.1em .1em .1em .8em;padding:.2em .6em;”><pre style=”margin: 0; line-height: 125%”>$ ruby songs-reduce.rb 16 </pre></div>
Here our accumulator is sum and after each iteration basedon our addition operator new value is set in sum. You also see reduce is provided with (0) this the initial value to start with. Ofcourse we must refactor and clean up above code to make it more like Ruby.
require 'csv'
songs = CSV.read('classic-rock-song-list.csv',
                  :headers => true,
                  :header_converters => :symbol)
total_playcount = songs.reduce(0) { |sum, song| sum + song[:playcount].to_i }
p total_playcount/songs.count
Output
$ ruby songs-reduce.rb
16

Reduce also has an alias which is inject both works the same way and there is no performance advantage for using one over another. Can be used based on the problem solving so that code written is easy to understand.
In this article we only shared few enumerables but Ruby has a long list of methods to search, sort, traverse, transform and manipulate collections. Some of the other popular ones are group_by, sort_by, min, max, min_by, minmax_by, minmax, flat_map, reject, reverse_each, each_with_index, each_with_object and many many more. Best way to use these methods is by refactoring your code constantly and consistently, write your original definition no matter how long, lousy or cumbersome it maybe and then go through various enums which one can help you improve your code. Some time combination of few would help while some day you would stumble upon some absolutely new method making your solution more elegant. Keep exploring this swiss knife of Ruby programming language and make your code better.

 The Ruby Workshop A Practical no-nonsense introduction to Ruby development. Learn by doing real-world development, supported by detailed step-by-step examples, screencasts and knowledge checks. Become a verified practitioner, building your credentials by completing exercises, activities and assessment checks, and get certified on completion.
Publisher : PacktPub
Release Date : November 2019
Role: Author
Complete Course : Microsite
Buy : Amazon
There are two ways to setup any React native project and starting building a iOS or Android – Expo CLI or React Native CLI. In this post we will learn what is expo, Key features and differences, Expo development environment setup, How Expo Works, Development tools with Expo, Expo commmunity and new ways of distributing your apps.
But before we talk about Expo few lines about React Native CLI the other way to develop React Native Apps.
What is React Native CLI
React Native CLI is the defacto way of building a React Native app. However you need some prerequisites besides node, watchman and react-native-cli along with Xcode & CocoaPods installed with command line tools udpdated for iOS development. For Android JDK and Android studio setup (and setting up these pre-requisites would require another post  ).
).
#What is Expo? Expo is complete workflow for creating React Native iOS and Android apps which is free to use. Just setup Expo with few commands and start typing your code in your favorite IDE without the hassls of interacting with Xcode or Android Studio – of course there is no hard in opening them but for a new mobile developer its more important to focus on your React Native code and building application rather learning more tools (well that’s just a suggestion). Besides React Native you get access to Expo SDK which provide an assortment of native APIs for iOS and Android.
Key Features of Expo
- Access to device capabilities like camera, location, notifications, sensors, haptics, and much more, all with universal APIs
- Build service gives you app-store ready binaries and handles certificates
- no need for you to touch Xcode or Android Studio.
- Publish updates over the air whenever you want
- Hot reloading with companion expo app
- Over-the-air updates let you update your app at any time without the hassle and delays of submitting to the store
- Publish apps as Expo app
- Publish standalone app on app stores
Expo CLI setup
Prerequisites
- 1.Recent version of Node.js
- 2.A phone or a emulator
Getting Started with Expo
- 1.Once prerequisites are in place which is mainly Node.js v12 or later you can install Expo CLI with following command:
npm install -g expo-cli
- 2.Create a new React Native project called “SampleProject” with following command
expo init AwesomeProject
- 3.Traverse into this directory and run following command to start your development server
cd AwesomeProject
npm start or expo start
- 4.That’s it !
Approx time to get started and start building your React Native application with expo few minutes.
To try the application on your device download Expo companion app from AppStore and see your app loaded on it live.
Development Tools with Expo
Expo Cli
Expo CLI is a one stop place to Serve, build and publish Expo projects. Some key commands of the CLI.
Installtion -> npm install -g expo-cli
Start local server and provides URL -> expo start
Initializing new project with sample code -> expo init
Open app in iOS simulator expo ios
Open app in in android device expo android
Signed IPA for submission to Apple App Store -> expo build:ios
Signed APK for submission to Google Play Store -> expo build:android
Eject and create Xcode and Android Studio project for your app -> expo eject
. . . and many more
Expo Client
Download Expo Client application from Apple Appstore or Google Playstore run your projects instantly. See the changes from you local immediatly, interact with device capabilities with ease.
Expo SDK
Access native device APIs with Expo SDK which supports latest React Native versions. Few of the popular APIs available to use:
Camera : Access device camera to capture images, save photos, add filters and lot more.
File System : Read and save documents, assets, images and other data objects stored in the device file system.
Accelerometer : Access to Accelerometer Sensors provides inputs to chenges in device when in motion to undertand the 3D space.
Push Notifications : Send and receive push notification with just few lines of code in JavaScript for cross platform notifications.
. . .
and many more more
Snack
Snack lets you build entire React Native projects in Browser with no download or setup required. If you are not sure about Expo or even React Native or just wanna try some quick and nifty snippet Snack is a place to visit.
Distribution of App
Testing : For testing purpose you can publish you app using Expo Dev Tools (simply click publish button). This automatically minify your core and generates two version one for iOS and one for Android. This is automatically then uploaded to a CDN and your the link for your project which you can shjare with any anyone to load it in their expo client app.
Community
Need help while working or just want to stay in touch with community members join the following channels:
- Expo slack channel -> https://slack.expo.io/
- Expo community forums -> https://forums.expo.io/
$ npm install express react
Once this is done, next lets create two files one for our react components(component.js) and second one will be the setup file for our express server(express.js).
In component file lets create a simple component :
var React = require('react');

var Component = React.createClass({
 render: function() {
  return React.createElement('h1', null, this.props.msg);
 }
});

module.exports = Component;
This component does nothing much simply returns h1 tag, has no props and its inner html is this.props.msg.
Next, in our express.js file lets require express, react and our component :
var express = require('express');
var React = require('react');
var Component = React.createFactory(require('./component'));
If you notice our component is wrapped in a React.createFactory() which will turn our component into a function where we can pass our props 
Next, we will instantiate our express and add some routes and its corresponding function :
var app = express();

function main(request,response) {
 var msg = request.params.msg || 'Hellooo';
 var comp = Component({msg:msg});
 response.send(comp);
}

app.get('',main);
app.get('/:msg',main);
Finally we will set it up to listen on port 4000 :
app.listen(4000)
Before explaing what is happening in home function lets fire up our terminal and run our application:
$ nodemon express.js
You will get following result on your browser :

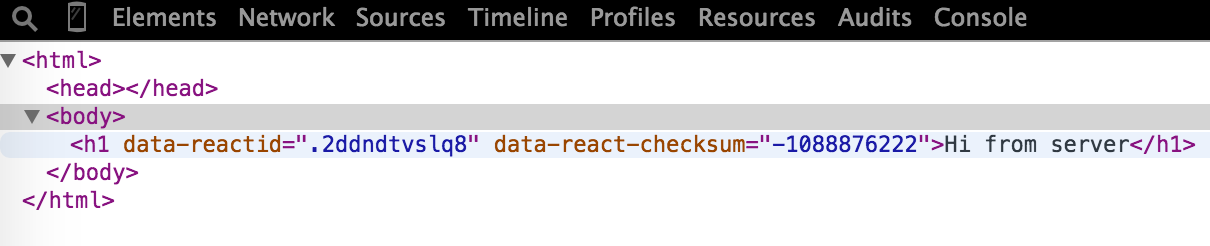
What we got here is a json representation of our component. To get our component rendered properly is by modifying our code by passing the component to React.renderToString :
function main(request,response) {
 var msg = request.params.msg || 'Hi from server';
 var comp = Component({msg:msg});
 response.send(React.renderToString(comp))
}
Lets try out now :

Lets pass a message parameter too http://localhost:4000/YooHoo :

Also, if you look at your developer tools you will find all react data attributes assigned to this element:
You can find this code at github :https://github.com/akshatpaul/react-examples/tree/master/react-server-side
]]>$ react-native init WebviewShell
This will generate all necessary files for a iOS application. You can test this by building this application via Xcode.
Next, open up file index.ios.js and replace its code with following the following one :
| 1 2 3 4 5 6 7 8 9 10 11 12 13 14 15 16 17 18 19 20 21 22 23 24 25 26 27 28 | ‘use strict’; var React = require(‘react-native’); var { AppRegistry, StyleSheet, Text, View, WebView } = React; var WebviewShell = React.createClass({ render: function() { return ( <View style={styles.container}> <WebView url={‘https://www.facebook.com/‘} /> </View> ); } }); var styles = StyleSheet.create({ container: { flex: 1 } }); AppRegistry.registerComponent(‘WebviewShell’, () => WebviewShell); |
Let us see what we have done here. We have created a component WebviewShell which returns a View. This view returns a WebView which loads our desired url :
| 1 2 3 4 5 6 7 8 9 | var WebviewShell = React.createClass({ render: function() { return ( <View style={styles.container}> <WebView url={‘https://www.facebook.com/‘} /> </View> ); } }); |
When we build our project in xcode it looks something like this :

Source code for this project is available at https://github.com/akshatpaul/react-examples/tree/master/WebviewShell
Exhaustive documentation on this topic is available at React-native docs https://facebook.github.io/react-native/docs/webview.html#content
]]>It’s different !
What is react?
React js is a lightweight front end JavaScript library that is used for creating user interfaces. Sometimes referred as V in the MVC (which is a self-admission on React official documentation). React is very unique one of its vital feature is that it can be rendered on server side too, and both client-server can work together interoperable.
Some other facts about React – it was created by Facebook R&D, first released in 2013. It is used at Facebook in production, and Instagram.com is completely written in React.
Why we need something like react?
We have long way from traditions request-response model of web development. With ajaxification of apps user can’t wait for the request to go respond back and page to reload. And advent of single page apps became faster but at the same time complex. We can no longer re-render a page when a request occurs. Managing the state itself became difficult. These problems are something devs face everyday and React is the facebook/instagram team way of solving them. React philosophy greatly differs from usual frameworks. In this article we will explore how react is changing tradition way of thinking by understanding its key concepts which are disrupting conventional way of building front-end apps.
Key Concepts
Virtual DOM
Virtual DOM is a brand new concept, which abstracts away the DOM from you. Not so clear, let us go a bit deep on this feature. The problem responsible for creation of React was to render a section of the view as quickly as possible and Virtual DOM plays the significant role in helping achieveing this how? As the state changes Virtual DOM selectively renders sub-trees of nodes based upon this state change. This leads to least amount of DOM manipulation possible in order to keep your components aware of latest changes. In short react uses a fake DOM.
Lets take an example of a car which is our object, and has all features what a car must have, what Virtual dom does is it simply copies this cars current state (makes its replica). Now if we take this car object and make some changes like adding a gps system, changing its color, or a new cowboy style bumper. In react world when these changes are made two things happen – One, react runs a algorithm which recognizes that these changes have been made and what are the differences. Two, it updates the Dom with these differences. In other word it does not build the car again from ground up rather only make the required changes of color, gps and new bumper.
Before we move to next key concept let’s first install react to understand the examples more clearly.
Installation
The easiest way to start working with React is using JSFiddle examples :
React JSfiddle with JSX (we will learn about JSX shortly) -> https://jsfiddle.net/reactjs/69z2wepo/
React JSfiddle > https://jsfiddle.net/reactjs/5vjqabv3/
Other way is to download complete starter kit to even work offline
http://facebook.github.io/react/downloads/react-0.13.3.zip
You may also install react-tools this required npm :
npm install -g react-tools
Another usefull instrument to boost your productivity with React is React developer tools. Which is a very useful chrome extension that allows you to inspect React component hierarchy in chrome browser.

Before we dwelve into next section its time for “Hello World” program. Lets create a ‘helloworld.html’
| 1 2 3 4 5 6 7 8 9 10 11 12 13 14 15 16 | <!DOCTYPE html> <html> <head> <script src=”build/react.js”></script> <script src=”build/JSXTransformer.js”></script> </head> <body> <div id=”intro”></div> <script type=”text/jsx”> React.render( <h1>Hello, world </h1>, document.getElementById(intro) ); </script> </body> </html> |
If you have download reactjs version from github you will find react.js & JSXTransformer.js in build folder. Else, you can simple refer to following urls
react.js : http://fb.me/react-0.13.3.js
JSXtransformer : http://fb.me/JSXTransformer-0.13.3.js
That was simple nothing much to explain except the keyword ‘React’ which is the entry point in to react library. Also, this react code can live in a separate file and can be referenced in the html. Lets create a separate file ‘src/helloworld.js’
| 1 2 3 4 | React.render( <h1>Hello, world </h1>, document.getElementById(intro) ); |
And reference in our ‘helloworld.html.’
| 1 | <script type=”text/jsx” src=”src/helloworld.js”></script> |
You can use simple python server to run your Hello World example
($ python -m SimpleHTTPServer)
Now that we are all setup let us looks at some other concepts of react.
JSX
JSX stands for JavaScript XML syntax transform and what does it do it lets you write HTMLtype tags in your JavaScript. In other words React uses a specified version of JavaScript called jsx. Whose basic notion is to provide intuitive syntactic sugar, which represents react internal version of the DOM and is used by react components (which are the building blocks of a react app). You are fundamentally just writing XML object representations.
We must note that JSX should eventually be converted into regular JavaScript. This can be done in few ways first one is include JSXTransformer.js in your project. Other way is to precompile JSX code beforehand. This we can do using command like tools. If we have already installed react-tools using npm as mentioned in last section simply run following command :
jsx –watch src/ build/
Components
In a react project components are the building blocks of your application. Components are modular, independent, dynamic representations of HTML in your application. Most of the times Components are children of other react Components.
Let us understand this with an example:
| 1 2 3 4 5 6 7 8 9 10 11 12 13 14 15 16 17 18 19 20 21 22 | /** @jsx React.DOM */ var car = React.createClass({ render: function() { return ( <p>{this.props.name}</p> ); } }); var Carlist = React.createClass({ render: function() { return ( <h1>My Cars:</h1>, <car name=”Mercedes /> ); } }); React.renderComponent( <Carlist />, document.querySelector(‘body’) ) |
As you see in this example there is a renderComponent what this does is it kicks off the application by rendering a component into the DOM node. You must be wondering what is this syntax I am looking at is it HTML nope its JSX (which we had discussed in our last section), which may look like HTML but is not representing actual DOM. This is reacts syntactic sugar which help us interact with virtual dom.
So far we see react is changing the way we work in front-end application. Its very different then other popular frameworks like Angular, backbone, ember and it wont be justice to them comparing it to react – as both have difference use cases. The only difference between react and other popular frameworks is that React expects you of getting and pushing data from the server. Which makes React very easy to implement front-end solution, since it simply expects you to hand it data rest all is handled by React.
BTW Who are using it ?
To build your confidence in this technology lets look at some popular apps who are using React in their production.
Air bnb
Yahoo
And many more…
We live in an era with so many js frameworks, no month passes by that we don’t find a new js framework to test. Sometimes its hard to find which framework suits our requirements. But react seems worth spending the time, for starters you may just include it to build some component in your existing application coz its light weight it wont impact your app and gradually you may convert your complete with React components.
Further Reading
React community is evolving very quickly every other week you find something new created. You may further read about Flux (application architecture which uses React views), React-Native (for building native user interface using React), Relay (framework from Facebook that provides data-fetching functionality for React apps).
Read this article and more in June 2015 edition of HealthyCode Magazine at http://healthycodemagazine.com/
]]>This is an active post where I update references and code snippets to quickly build app using RubyMotion. So lets start . . .
Changing background color
Objective-C
| 1 2 | [webView setOpaque:NO]; webView.backgroundColor = [UIColor clearColor]; |
Corresponding RubyMotion Code
| 1 2 | self.view.setOpaque(false) self.view.backgroundColor = UIColor.clearColor |
**
Loading application in Webview + making url open in safari
Objective-C
| 1 2 3 4 5 6 7 8 9 10 11 12 13 14 15 16 17 18 19 20 21 22 23 24 25 26 27 28 29 30 31 32 33 34 35 36 37 38 39 40 41 42 43 44 45 | #import “WebView.h” @implementation WebView @synthesize webView = _webView; –(void) viewDidLoad { [super viewDidLoad]; UIWebView *webview = [[UIWebView alloc] init]; webview.autoresizingMask = UIViewAutoresizingFlexibleWidth; [self.view addSubview:webview]; self.title = @”Web View”; NSString *filePath = [[NSBundle mainBundle] pathForResource:@”WebView” ofType:@”html”]; [_webView loadHTMLString:[NSString stringWithContentsOfFile:filePath encoding:NSUTF8StringEncoding error:nil] baseURL:nil]; _webView.delegate = self; } –(BOOL) webView:(UIWebView *)inWeb shouldStartLoadWithRequest:(NSURLRequest *)inRequest navigationType:(UIWebViewNavigationType)inType { if ( inType == UIWebViewNavigationTypeLinkClicked ) { [[UIApplication sharedApplication] openURL:[inRequest URL]]; return NO; } return YES; } @end |
Corresponding RubyMotion Code
| 1 2 3 4 5 6 7 8 9 10 11 12 13 14 15 16 17 18 19 20 21 22 23 24 25 26 27 28 29 30 31 | class WebViewController < UIViewController def viewDidLoad super self.title = “Web View” self.view = UIWebView.alloc.init view.delegate = self webviewContent = File.read(App.resources_path + “/WebView.html”) #This requires Bubble-Wrap to be installed self.view.loadHTMLString(aboutContent, baseURL:nil) end #Open UIWebView delegate links in Safari. def webView(inWeb, shouldStartLoadWithRequest:inRequest, navigationType:inType) if inType == UIWebViewNavigationTypeLinkClicked UIApplication.sharedApplication.openURL(inRequest.URL) false #don’t allow the web view to load the link. end true #return true for local file loading. end end |
**
RubyMotion webview shell
To load a application in webview you can use following shell I have created.
https://github.com/akshatpaul/rubymotion-webview-shell
This shell is used create ios application for responsive urls
You require rubymotion tool chain installed on your system to use this shell.
Steps to create ios application in web view
- Step 1 (Install Dependencies)
- Inside cloned repository execute ‘bundle install’
- Step 2 (Add your URL)
- Goto main_controller.rb inside method viewDidLoad and replace url with desired url.
  def viewDidLoad
    self.view.loadRequest NSURLRequest.requestWithURL(NSURL.URLWithString("http://www.facebook.com"))
  end
- Step 3 (Test application)
- execute ‘rake’ to test the application.
That’s it !
Enjoy.
**
]]>XML has some benefits like balances open and closed tags. This makes large tree easier to read than function calls or object literals.
Let us look at a simple example first without JSX to see how things get simplified as we gradually include JSX.
| 1 2 3 4 5 6 7 8 9 10 11 12 13 14 15 16 17 18 19 20 21 22 23 | <!DOCTYPE HTML> <html lang=’en’> <head> <meta charset=”UTF-8″> <title>Hello World</title> <script src=”../react.js”></script> <script src=”../JSXTransformer.js”></script> </head> <body> <script > var Appo = React.createClass({ render:function(){ return React.createElement(“h1”,null, “Hello Dear”) } }); React.render(React.createElement(Appo), document.body); </script> </body> </html> |
Here, in this example we are using using React.createElement. In line #15 we pass a string representing html tag, second is our property and third is the child which is inner html in this case.
Next when we want to render our component in React.render we pass Appo component and target where it has to be loaded as document.body. The output will be something like this ->
Next, lets look at one more method however its is deprecated and no longer used. React ecosystem is developing so fast that already things are getting deprecated, however having a look at the past shows how far we have come in making things easier in such a short period of time.
| 1 2 3 4 5 6 7 8 9 10 11 12 13 14 15 16 17 18 19 20 21 | <!DOCTYPE HTML> <html lang=’en’> <head> <meta charset=”UTF-8″> <title>Hello World</title> <script src=”build/react.js”></script> <script src=”build/JSXTransformer.js”></script> </head> <body> <script> var Appo = React.createClass({ render:function(){ return React.DOM.h1(null, “Hello Past”) } }); React.render(Appo(), document.body); </script> </body> </html> |
In this example we use React.DOM (line #14) pattern where we specify the tag to be used in this case h1, and first parameter is the property and second is a string which will be used as our inner html. While rendering with React.render we pass our component function and target where to be loaded in this case document body. If we have latest react you will get following error in your console ->

This also remind us to use JSX.
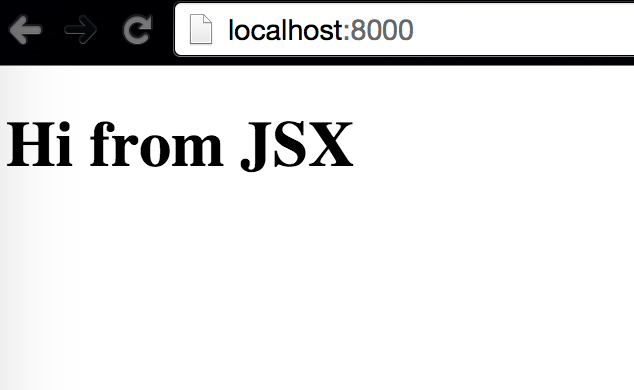
Let us now see how the same example looks when using JSX.
| 1 2 3 4 5 6 7 8 9 10 11 12 13 14 15 16 17 18 19 20 21 | <!DOCTYPE HTML> <html lang=’en’> <head> <meta charset=”UTF-8″> <title>Hello World</title> <script src=”build/react.js”></script> <script src=”build/JSXTransformer.js”></script> </head> <body> <!– with JSX –> <script type=”text/jsx”> var App = React.createClass({ render:function(){ return <h1>Hi from JSX</h1> } }); React.render(<App />, document.body); </script> </body> </html> |
Here, we include type as JSX which is jsx transformer the inbrowser transformer. We have our component App having h1 tags. Next we render the it using React.render passing our component in JSX syntax and second argument as target document.body – Thats It ->
Although JSX is not required explicitly with react but it is preferred, it lets you create JavaScript objects using HTML syntax. Components serves two purpose templates and display logic. Therefore, markup and code are tied intimately together, display logic often is quite complex and to express it using template languages does become difficult. Best way to solve this problem is generating HTML and components from JavaScript code itself. JSX helps in solving all these problems with its HTML type syntax to create React tree nodes.
]]>This gem is not installed straight forward like any other gem, if you have already included the same in your Gemfile and tried bundle install you may get following error.
Installing ruby-oci8 (2.1.7)
Gem::Ext::BuildError: ERROR: Failed to build gem native extension.
/Users/akshatpaul/.rvm/rubies/ruby-2.0.0-p247/bin/ruby extconf.rb
checking for load library path…
DYLD_LIBRARY_PATH is not set.
checking for cc… ok
checking for gcc… yes
checking for LP64… yes
checking for sys/types.h… yes
checking for ruby header… ok
*** extconf.rb failed ***
Could not create Makefile due to some reason, probably lack of necessary
libraries and/or headers. Check the mkmf.log file for more details. You may
need configuration options.
Provided configuration options:
–with-opt-dir
–without-opt-dir
–with-opt-include
–without-opt-include=${opt-dir}/include
–with-opt-lib
–without-opt-lib=${opt-dir}/lib
–with-make-prog
–without-make-prog
–srcdir=.
–curdir
–ruby=/Users/akshatpaul/.rvm/rubies/ruby-2.0.0-p247/bin/ruby
–with-instant-client
–without-instant-client
/Users/akshatpaul/.rvm/gems/ruby-2.0.0-p247/gems/ruby-oci8-2.1.7/ext/oci8/oraconf.rb:891:in `get_home’: RuntimeError (RuntimeError)
from /Users/akshatpaul/.rvm/gems/ruby-2.0.0-p247/gems/ruby-oci8-2.1.7/ext/oci8/oraconf.rb:707:in `initialize’
from /Users/akshatpaul/.rvm/gems/ruby-2.0.0-p247/gems/ruby-oci8-2.1.7/ext/oci8/oraconf.rb:320:in `new’
from /Users/akshatpaul/.rvm/gems/ruby-2.0.0-p247/gems/ruby-oci8-2.1.7/ext/oci8/oraconf.rb:320:in `get’
from extconf.rb:18:in `<main>’
—————————————————
Error Message:
Set the environment variable ORACLE_HOME if Oracle Full Client.
Append the path of Oracle client libraries to DYLD_LIBRARY_PATH if Oracle Instant Client.
Backtrace:
/Users/akshatpaul/.rvm/gems/ruby-2.0.0-p247/gems/ruby-oci8-2.1.7/ext/oci8/oraconf.rb:891:in `get_home’
/Users/akshatpaul/.rvm/gems/ruby-2.0.0-p247/gems/ruby-oci8-2.1.7/ext/oci8/oraconf.rb:707:in `initialize’
/Users/akshatpaul/.rvm/gems/ruby-2.0.0-p247/gems/ruby-oci8-2.1.7/ext/oci8/oraconf.rb:320:in `new’
/Users/akshatpaul/.rvm/gems/ruby-2.0.0-p247/gems/ruby-oci8-2.1.7/ext/oci8/oraconf.rb:320:in `get’
extconf.rb:18:in `<main>’
—————————————————
See:
* http://rubydoc.info/gems/ruby-oci8/file/docs/install-full-client.md for Oracle full client
* http://rubydoc.info/gems/ruby-oci8/file/docs/install-instant-client.md for Oracle instant client
* http://ruby-oci8.rubyforge.org/en/file.report-installation-issue.html to report an issue.
extconf failed, exit code 1
Gem files will remain installed in /Users/akshatpaul/.rvm/gems/ruby-2.0.0-p247/gems/ruby-oci8-2.1.7 for inspection.
Results logged to /Users/akshatpaul/.rvm/gems/ruby-2.0.0-p247/extensions/x86_64-darwin-12/2.0.0-static/ruby-oci8-2.1.7/gem_make.out
An error occurred while installing ruby-oci8 (2.1.7), and Bundler cannot continue.
Make sure that `gem install ruby-oci8 -v ‘2.1.7’` succeeds before bundling.
Next when you try installing the gem itself by executing gem install ruby-oci8 -v ‘2.1.7’ or any version you will get stuck here :
gem install ruby-oci8 -v ‘2.1.7’
akshatpaulsmbp2:pett akshatpaul$ gem install ruby-oci8 -v ‘2.1.7’
Building native extensions. This could take a while…
/Users/akshatpaul/.rvm/rubies/ruby-2.0.0-p247/lib/ruby/site_ruby/2.0.0/rubygems/ext/builder.rb:73: warning: Insecure world writable dir /usr/local in PATH, mode 040777
ERROR: Error installing ruby-oci8:
ERROR: Failed to build gem native extension.
/Users/akshatpaul/.rvm/rubies/ruby-2.0.0-p247/bin/ruby extconf.rb
checking for load library path…
DYLD_LIBRARY_PATH is not set.
checking for cc… ok
checking for gcc… yes
checking for LP64… yes
checking for sys/types.h… yes
checking for ruby header… ok
*** extconf.rb failed ***
Could not create Makefile due to some reason, probably lack of necessary
libraries and/or headers. Check the mkmf.log file for more details. You may
need configuration options.
Provided configuration options:
–with-opt-dir
–without-opt-dir
–with-opt-include
–without-opt-include=${opt-dir}/include
–with-opt-lib
–without-opt-lib=${opt-dir}/lib
–with-make-prog
–without-make-prog
–srcdir=.
–curdir
–ruby=/Users/akshatpaul/.rvm/rubies/ruby-2.0.0-p247/bin/ruby
–with-instant-client
–without-instant-client
/Users/akshatpaul/.rvm/gems/ruby-2.0.0-p247/gems/ruby-oci8-2.1.7/ext/oci8/oraconf.rb:891:in `get_home’: RuntimeError (RuntimeError)
from /Users/akshatpaul/.rvm/gems/ruby-2.0.0-p247/gems/ruby-oci8-2.1.7/ext/oci8/oraconf.rb:707:in `initialize’
from /Users/akshatpaul/.rvm/gems/ruby-2.0.0-p247/gems/ruby-oci8-2.1.7/ext/oci8/oraconf.rb:320:in `new’
from /Users/akshatpaul/.rvm/gems/ruby-2.0.0-p247/gems/ruby-oci8-2.1.7/ext/oci8/oraconf.rb:320:in `get’
from extconf.rb:18:in `<main>’
—————————————————
Error Message:
Set the environment variable ORACLE_HOME if Oracle Full Client.
Append the path of Oracle client libraries to DYLD_LIBRARY_PATH if Oracle Instant Client.
Backtrace:
/Users/akshatpaul/.rvm/gems/ruby-2.0.0-p247/gems/ruby-oci8-2.1.7/ext/oci8/oraconf.rb:891:in `get_home’
/Users/akshatpaul/.rvm/gems/ruby-2.0.0-p247/gems/ruby-oci8-2.1.7/ext/oci8/oraconf.rb:707:in `initialize’
/Users/akshatpaul/.rvm/gems/ruby-2.0.0-p247/gems/ruby-oci8-2.1.7/ext/oci8/oraconf.rb:320:in `new’
/Users/akshatpaul/.rvm/gems/ruby-2.0.0-p247/gems/ruby-oci8-2.1.7/ext/oci8/oraconf.rb:320:in `get’
extconf.rb:18:in `<main>’
—————————————————
See:
* http://rubydoc.info/gems/ruby-oci8/file/docs/install-full-client.md for Oracle full client
* http://rubydoc.info/gems/ruby-oci8/file/docs/install-instant-client.md for Oracle instant client
* http://ruby-oci8.rubyforge.org/en/file.report-installation-issue.html to report an issue.
extconf failed, exit code 1
Gem files will remain installed in /Users/akshatpaul/.rvm/gems/ruby-2.0.0-p247/gems/ruby-oci8-2.1.7 for inspection.
Results logged to /Users/akshatpaul/.rvm/gems/ruby-2.0.0-p247/extensions/x86_64-darwin-12/2.0.0-static/ruby-oci8-2.1.7/gem_make.out
No problem, now lets install ruby-oci8 the right way
Simply follow following steps in order and you will be done :
Step 1
Go to oracle web site for some downloads http://www.oracle.com/technetwork/topics/intel-macsoft-096467.html.
Step 2
Download the 64bit versions of instantclient-sqlplus, instantclient-sdk, instantclient-basic – the 32bit versions do not work with OSX 10.92.
Note : Please download 64bit version only as 32bit just wont work on your OS 10.8+ version. Also you would require oracle login credentials to download this free stuff.
Step 3
Create directories at /opt/oracle incase its not yet created with following command:
$ mkdir /opt/oracle
Step 4
Unzip instantclient-basic, move to /opt/oracle the unzipped folder will be something like instantclient_11_2.
Note : we will be moving other two unzipped folders in this folder, wont keep them separately.
Step 5
Next unzip instantclient-sqlplus move its filed & folders to /opt/oracle/instantclient_11_2/
Step 6
Next unzip instantclient-sdk move its contents /opt/oracle/instantclient_11_2/
Step 7
Next, via terminal we will add some env variable. First, DYLD_LIBRARY_PATH=/opt/oracle/instantclient_11_2 export DYLD_LIBRARY_PATH
Secondly, ORACLE_HOME=/opt/oracle/instantclient_11_2 export ORACLE_HOME
Check if env variables are created properly by executing $ env
Step 8
Now we will create a sym link. Go to instantclient_11_2/ by executing cd /opt/oracle/instantclient_11_2.
run $ ln -s libclntsh.dylib.11.1 libclntsh.dylib
Step 9
Now run gem install ruby-oci8
]]>